Saturday, September 30, 2017

September 2017 | MONTH IN REVIEW


Here's a quick summary of what we were up to this month.

  • We finally re-bedded the aluminium rail and stanchions on the port side! If you read our 'August 2017 | Month In Review' post, you'd know that this was our second attempt. If we had a dollar for every time we had to re-do a job because the epoxy, sikaflex or silicone set too fast or didn't set at all. We'd have a sizeable nest egg!
  • We made little progress with the Sail Jib Track project. The weather has not been co-operative. It's not called the rainy/hurricane season for nothing.
  • Speaking of hurricanes, it's been a tough month for those affected by the hurricanes Harvey, Irma, Jose and Maria. Very heart breaking to see all the islands, boats, homes destroyed and lives lost. Mother nature is not happy. It's a harsh call to remind us that climate change is real and we need to look after our planet {bring our own bags, say no to straws}.
  • A couple of months ago, we re-bedded the cleats on the deck. We are now in the process of re-bedding the other remaining deck fittings. Yes, it never ends! So many deck fittings... and all installed without first protecting the balsa core with epoxy (seems ALL boat builders cut corners), resulting in areas of rotted core where water had leaked in. :( 
  • We co-hired a car from Econo Car Rentals with S/Y Katarina. The price increased from $125 TTD/day to $150 TTD/day. A little dearer but still cheaper to hire a car than to take a taxi to the airport. Fortunately, we had a free upgrade and so the car was not as shitty as the last one. Unfortunately, on the last day, while Alex and Tony were shopping for some boat parts, the car was towed for "illegal parking" which cost $500 TTD to release even though there were no signs anywhere on the street to indicate "No Parking"! After our car was towed, 3 other cars parked on that same stretch and nothing happened. What luck!
  • I celebrated my birthday on board at the boatyard. I had a day off from boat work. No cleaning, handing Alex tools, cooking or washing {yay!}. Special thanks to Alex for making me a special brunch and dinner that day and preparing breakfast all week! :) I was also very happy to receive lovely birthday greetings from my family & friends. 
  • We met another Aussie sailor, Dave from Sydney on S/Y Syreni.

Check out our posts this month:

Forepeak Repairs

FAQ | Costs of Cruising

The Rain in Port of Spain

The Fuel Tank Project (Part I)


August 2017 | MONTH IN REVIEW >>

October 2017 | MONTH IN REVIEW <<


Re-bedding the aluminium rail on the port side with life seal
Re-bedding the port stanchions with life seal
Jib Sail Track Project - Sanded 4cm around the edges
There's Rambutan in Trini!! But at $87.99/kg (~$12.57 USD/kg)??! :O 
Needless to say we did not get any..
My special brunch and dinner! {tastes better than it looks} Thanks for helping me make the Chocolate Fridge Cake.. and by help I mean pouring it into the mould! ;)
Every now and then I find a grasshopper on board (usually on my clothes). Cute ey? :)

Till next month, thanks for following our journey!
    Read More »

    Wednesday, September 20, 2017

    The Fuel Tank Project (Part I)


    The Fuel Tank Project - wish we didn't have to do this, but.. Alex was very determined and after much deliberation, the project is now underway. After all the hard work we put into cleaning & repairing the engine, we did not want to risk dirty diesel spoiling it. 

    The fuel tank is 20 years old and has never been cleaned. What's the objective of this project? To add an inspection port, clean the inside and install a fuel polishing system, comprised of a fuel pump & 2 filters, to keep it clean thereafter.

    Of course like a lot of things on board, the tank was installed in such a way that it was never intended to be accessed post install {go figure}.. So Alex had to cut an access hole in the wall of the queen sized cabin.

    The initial access hole

    Unfortunately, as you know, nothing is ever quite that simple, easy or straightforward on a boat. After spending several hours unsuccessfully attempting to take it out, he ended up having to remove the entire wall! 

    Could not, would not come out! until..
    The entire wall was removed

    We carried the tank out and placed it under the boat so we could work on it with ease. Of course this did not go as smoothly as planned; even though we drained as much diesel as we could, some residual diesel still spilled out onto our luggages in the cabin as we were carrying the tank out 😖 {diesel really smells bad!}.

    Fuel tank under the boat

    We cleaned the outside of the tank with a scour and rust remover. The tank looks pretty good, except for the bottom which has some deep pitting (probably from standing on a wet base for a long time).

    Alex then made the inspection port backing plate & cover from two (12" x 9") 3mm stainless steel plates. Drilling the holes in the stainless steel plates was a pain. We had to drill 14 holes on each plate. Oh and by "we" I mean Alex, while I helped to clamp the drill guide tool and hold down the table {hard work!}.

    Each hole started off with a 1/8" drill bit (until both broke and we finished the job with a 3mm drill bit), then a 3/16" drill bit and finally a 6mm drill bit. That's 3 times per hole x 14 holes x 2 plates! Making it a total of 84 times of aligning the drill guide to the hole, clamping it down, changing the drill bits, placing it on the bench vice, and of course the actual drilling!

    Update: Alex later enlarged the 6mm holes on the cover plate to 7mm to allow for thermal expansion of the cover plate.

    14 holes per plate
    In case you were wondering, the drill guide tool is that vertical piece with holes (made from nickel-alloyed steel that is heat treated for durability)
    Cutting out the middle with an angle grinder to make the backing plate

    Fortunately, we bought the 'drill guide tool' in June. It helps to keep the drill bit perpendicular to whatever you are drilling -- like a portable (poor man's) drill press for precision alignment. It works well. Having said that, we still broke a couple of drill bits but that was due to placing the clamps a little too close to the drill hole and when the drill chuck "hit" the clamp, it snapped the drill bit.  

    Next, we tried our best to flush out the residual diesel in the tank with soap and water. As a safety precaution, we filled up the tank with water before Alex cut out the inspection port hole with an angle grinder. Very glad all went well -- no explosion.

    Marked, drilled some holes and cut out the hole with a grinder
    Alex used the backing plate to mark the holes on the tank and smoothed the edges with a file.

    With the access hole, we were able to stick our arms in to scoop out the sludge and clean the inside of the tank with a scour and detergent. For the bottom of the tank, where we could not reach, we used de-greaser and a Karcher K2 pressure washer which we borrowed from our friend Tony. We loved the pressure washer! Very compact and powerful. It's definitely on our "to buy" list, whenever we can find a 240V version!

    Cleaning the inside of the tank with pressure washer

    The tank is now clean inside and out! 

    Top left & right: The sludge from inside the tank {yuck}
    Bottom left & right: Before and after using de-greaser & pressure washer

    Next steps: To get the bolts welded onto the backing plate, paint the bottom of the tank (maybe?), and order the fuel filters (Racor 500FG & 10" stainless steel Shelco), pump (Walbro FRB-22) & variety of connection fittings from the US. 

    Till our next update!


    Read More »

    Wednesday, September 13, 2017

    FAQ | Costs of Cruising

    cost to sail


    One of the most frequently asked question we get is "How much does it cost to cruise?"


    Honestly, there's no simple or straight answer to this question. Cost of cruising depends on many factors such as (but not limited to)

    • Location - Cost of food, local travel, cruising permits, visa fees vary from country to country. For example, we found that in general, sailing in Asia (e.g. Malaysia, Philippines, Thailand) is a lot cheaper than sailing in South America/Caribbean (e.g. Brazil, French Guyana, Trinidad & Tobago).
    • Type & Size of Boat - Catamaran or mono-hull? Cost of mooring, marina, haul out, boatyard fees vary based on the type and size of your boat. Being on a catamaran, we're a lot wider than a mono-hull; even though we've seen plenty of mono-hulls taking up the same space in a berth, we get charged almost double the mono-hull rate. And of course, the longer your vessel, the more expensive it gets. We love it when we anchor for free!
    • Condition of Boat - Old boat or new boat? They all have their issues. It helps of course, if the boat is well maintained, but pretty much everything (and we mean everything) on a boat requires repair/replacement/maintenance/upgrade at some point. This means there will be costs for boat stuff i.e. parts, equipment, tools, materials, etc. As you know, BOAT stands for break out another thousand!
    • Hire or D.I.Y - Additional costs of boat repair/maintenance/upgrade can also vary if you hire someone to do it for you versus doing it yourself. Depending on where you are, labour cost can be steep. From experience, we find that (more often than not) it's better to do it yourself (if you can); not only to save on cost, but the hired help may not necessarily do a better job and you may end up having to re-do it (of course, there are exceptions). Unless you have very deep pockets, it's best to roll up your sleeves and get your hands dirty.
    • Motor or Sail - As much as we'd love to sail at all times, we still need to motor when approaching a marina, an anchorage or when we don't want to drift for days in light winds to our destination. We also have an outboard on our dinghy which we use to take us to & from shore and to explore where we can't go with the boat. So the cost for fuel will depend on how much we use. We do try our best to fill and stock up in places where fuel is cheap whenever we can (but petrol has a limited shelf life so that's not always advised).
    • Unexpected Expenses - All is well until you hit reefs, or large floating objects (a log or a whale for example), sustain damage when caught in a bad storm (or worse, a hurricane). We've had our fair share of unexpected costs to replace electronic equipment and conduct repairs after being struck by lightning on one occasion & hitting power lines on another. It's wise to set aside some funds for such instances.
    • Other Expenses - Boat or personal insurance, safety equipment, communications cost, charts and sailing guides, flights and travel cost to visit family or friends, gifts and memberships are just some examples of other expenses to consider as well.
    • Crew -  Are you sailing alone, with your partner, family and kids, pets, paid crew? Obviously, the more mouths to feed, visas to pay (where applicable), etc the higher the cost.
    • Lifestyle - This cost can vary significantly as well. Since we have no income and travelling long term takes a toll on our savings, we need to manage our finances carefully. This means we consciously choose to anchor for free over going into a marina, cook onboard over eating out, skip expensive attractions, take the bus or walk over taxis, do our own repairs vs. hiring people, drink water instead of champagne, you get the idea. Won't lie, this lifestyle can get tough at times; counting pennies is no fun. But on the bright side, we get fresh air, free water & power (when we're out at sea, that is..), fish (if we're very lucky), no deadlines (well, kind of) and healthier meals when we cook onboard! :)

      We track our expenses everyday on a spreadsheet and when we're on the go, we use a free expense tracker app like 'Spending' or 'Track My Spend' on our phone. For more information about the apps, you can read our 'Top 11 Favourite Phone Apps' post.

      Sailing Cost Categories
      Categories of our expenses

      Our biggest expenses at the moment go to Boatyard fees and Boat Stuff. We hauled out in March 2015 and left Raptor unattended on the hard in May for 16 months - unplanned of course. We got back last September and have been working diligently to complete our long list of boat repairs & maintenance and hope to get her shipshape by January 2018.  

      If you're interested in seeing some numbers, we found some great blogs that have done an amazing job in capturing and sharing their cost to cruise {thank you}. 


      We know every cruiser & boat is unique. You may have the same type & size of boat with the same number of people onboard in the same location as someone else, but you may have different boat projects, unexpected expenses and lifestyle choices. 

      Much like living on land, everyone spends differently. Having said that, it's great to find more and more cruisers sharing this information so that others can learn and get a sense of how much it costs to cruise. 

      If you're trying to work out if this lifestyle is feasible for you, using other people's budget/expenses as a reference point is a great start but of course ultimately, only you know what your needs are, the lifestyle you want, and what you can or can't live without. 

      It's always good to budget for more than what you think you need, but also don't let that stop you from sailing away if you're just slightly under your goal (and by this, we mean the budget for cruising which does not include the cost of acquiring a boat). You'll find that you can live on a lot less than you think.

      You can also look into ways to make money to fund your travels while underway (we've recently been looking into this... more on this later) or take a break, get back into the rat race to earn and save again whenever you need to (provided you can find a job or have portable skills).

      Surprising as it may sound, when you weigh it all up, the costs of cruising is actually more affordable than most people imagine. In fact, it's not uncommon that some find it cheaper to cruise than to live on land (depending where you choose to cruise geographically).

      Perhaps it's because when living aboard, your mindset and priorities change. The money that would be spent on clothes, shoes, entertainment, drinks and eating out can now go towards boat costs and travel kitty!

      Hope this was somewhat helpful. Oh, and if you're interested to read more sailing blogs, check out our 'List of Sailing Blogs' post.


      Happy saving, costing, budgeting & sailing! 😁


      Read More »

      Tuesday, September 12, 2017

      The Rain in Port of Spain


      Last Saturday, we got caught in heavy rain,
      The streets got flooded in Port of Spain.
      We filled our backpacks with veggies and fruit,
      Our shoes got wet and so did our loot.
      We waited an hour for the rain to subside,
      And a record time of 3 & 1/2 hours for our bus ride!
      We got home late, way past dinner time,
      We survived! and we hope you enjoyed this little rhyme! :)


      Read More »

      Wednesday, September 6, 2017

      Forepeak Repairs

      Here's another post on boat projects. This time it's both forepeaks (i.e. the interior part of a vessel that is furthest forward) or as Alex likes to call it, the munchkin quarters. 

      Last month, Alex finally repaired the crack in the starboard forward bulkhead, reinforced the floorboard in the starboard forepeak with fiberglass, and covered it with PVC foam board for a smooth finish that is both waterproof & easy to clean.

      Alex in the starboard forepeak - sanding and vacuuming the area, prepping it to be reinforced (not a comfortable area to work in, as it necessitates crawling through the access port into a very narrow, raw fiberglass area, that has no air circulation). Did you notice the crack? ;)
      Applied fiberglass & epoxy on existing floorboard
      Topped it with PVC foam board

      He also replaced the entire floorboard on the port side with fiberglass laminated plywood (& PVC foam board on top), as we discovered that the ply was too weak to reinforce - at one point we had some water leak into the forepeak without our knowledge, and it sat on the ply for several months. This eventually weakened the ply & made it buckle somewhat.

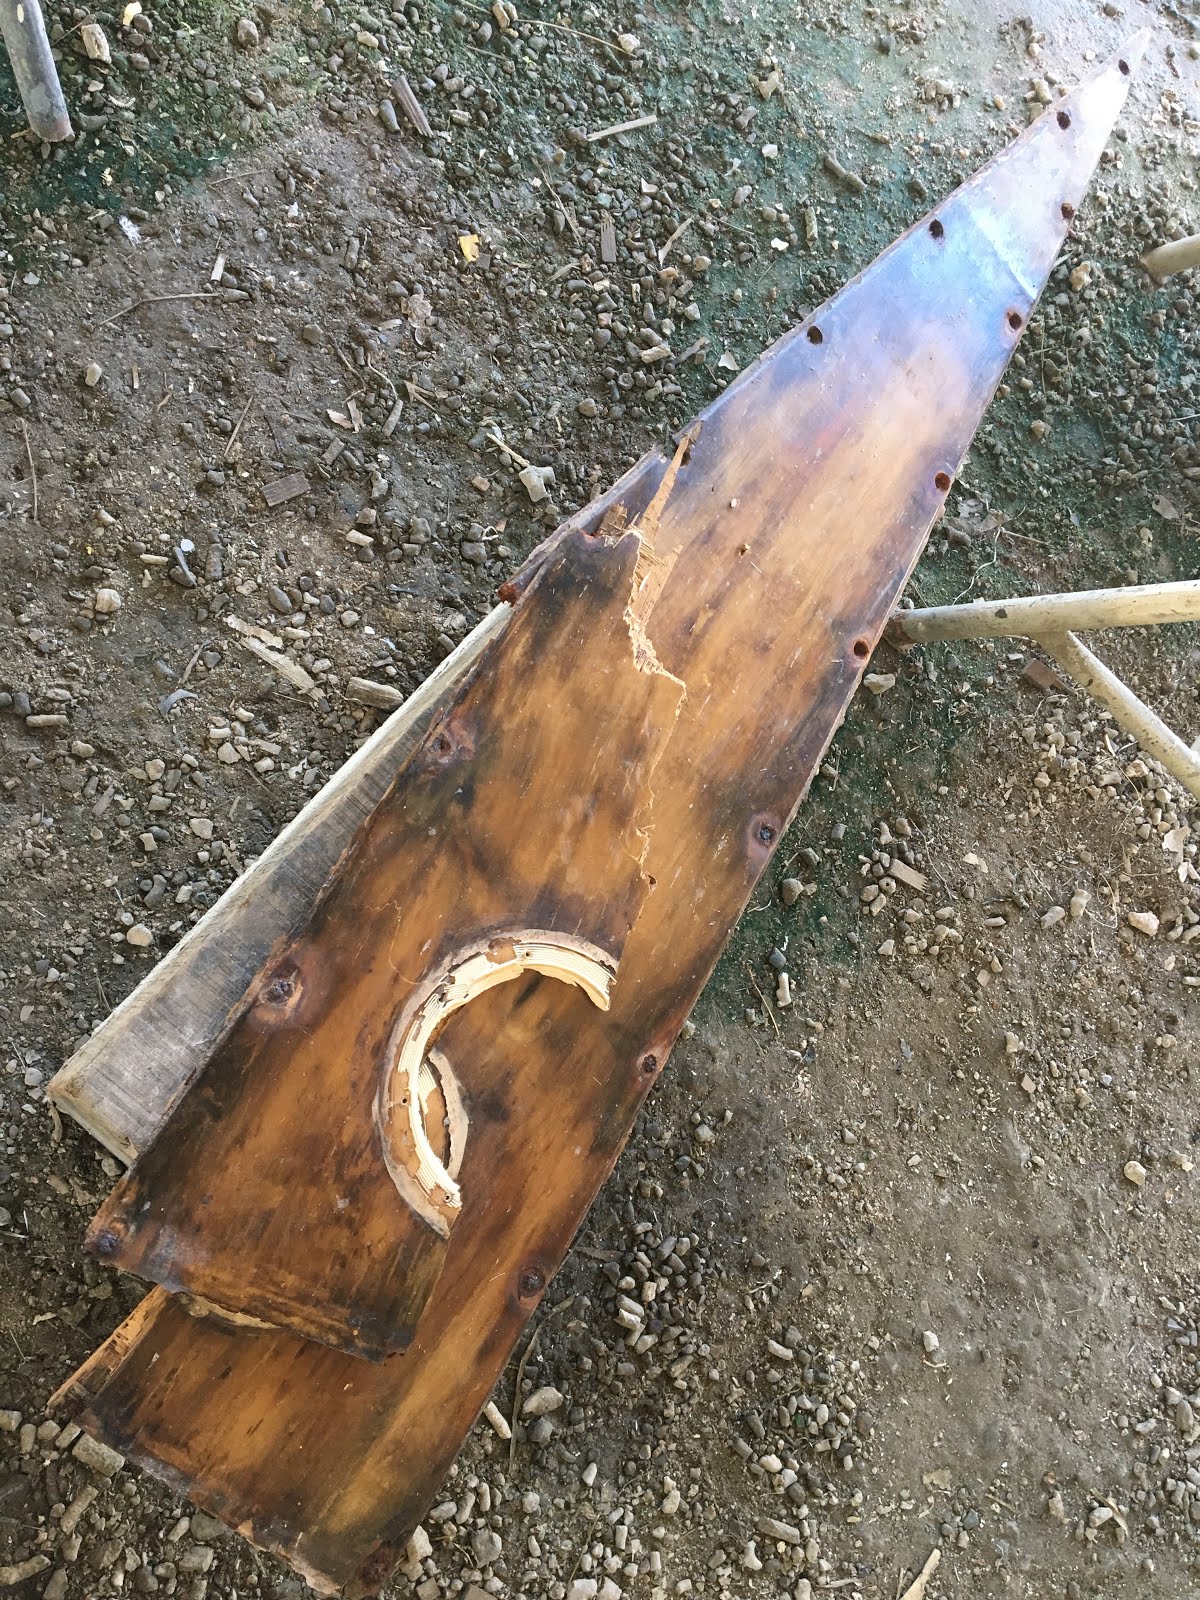
      This is the damaged floorboard removed from the port side

      We bought a piece of plywood, cut it to shape and reinforced it with fiberglass prior to fitting it back in the port forepeak.

      Alex spreading the epoxy on the fiberglass with a metal roller
      The floorboard was made out of 2 pieces to allow it to fit through the access port. This is obviously the bow section...
      And this is the back part. Here's how we reinforced the plywood with fiberglass:
      First, we applied a layer of epoxy on the "underside" of the plywood with a brush
      Then, we placed the pre-cut fiberglass on the plywood and applied another layer of epoxy
      Next, we spread the epoxy with a metal roller and set this aside to dry. Once dry, the fiberglass is sanded smooth
      From top left to bottom right: The rotted floorboard removed from the port forepeak, the reinforced plywood sections, with fiberglass on the underside, are glued with epoxy & screwed into place, then another layer of fiberglass & epoxy is applied on the top side, and covered with the pre-cut PVC foam board (while the epoxy is still wet of course)
      Finally a spinout is glued in with Sikaflex. This is what both forepeaks look like now

      We also decided to make two new inspection ports to replace the old ones (which were made of plywood that we felt was a little too thin to be part of a bulkhead).

      Found a piece of thicker plywood
      Alex cuts the inner hole with a jig-saw while I help to hold it in place
      The jig-saw is a really useful tool. So much faster and neater than trying to do it manually. Thanks Rene for lending it to us!
      Next, Alex sanded it and applied 2 coats of epoxy to protect the wood
      Sticking a strip of foam around the edges for a better seal
      Placing a new spin-out on the inspection port

      That's all for now. We have yet to paint the two inspection ports. Will update and post photos of that when we're done.

      When you're a catamaran, you have two of everything. Sure, double the space and comfort but also double the cost and repairs!

      Thanks for following our boat projects! ;-)
      Read More »